> ## Documentation Index
> Fetch the complete documentation index at: https://integrate.essentry.com/llms.txt
> Use this file to discover all available pages before exploring further.
# Installation
## Prerequisite
This section covers all requirements to run the essentry cloud connector.
### Supported Configurations
To enable essentry to integrate with a locally or remotely installed system (for example an on-premise access control system), one of the following configurations are required.
The essentry cloud connector is:
1. installed on the same system as the integrated system.
2. installed on a satellite system, able to communicate with the integrated system.
### Local System Hardware Requirements
| Hardware Component | Minimal | Recommended | Description |
| ------------------------- | ------------------ | ---------------- | ------------------------------------------------------------- |
| Hard drive space | 5GB (free) | - | Cloud connector software, logs, and backups |
| CPU | Dual Core | Quad Core | Cloud connector heavily relies on multi-threading |
| Memory (RAM) | 500 MB (available) | 2 GB (available) | Depends on traffic |
| Internet connection speed | 5 Mbit/s | > 10 Mbit/s | Depends on the traffic, affects backend synchronization speed |
### Local System Software/Firewall Requirements (essentry cloud connector)
1. Supported Operating Systems: [https://github.com/dotnet/core/blob/main/release-notes/10.0/supported-os.md](https://github.com/dotnet/core/blob/main/release-notes/10.0/supported-os.md)
1. Windows 10 / 11 / Server 2012 / other
2. Open Ports: 443 (HTTPS) to `*.essentry.com`
The installer bundles and installs all required dependencies, including the
.NET Runtime and ASP.NET Core Runtime. You no longer need to install these
manually.
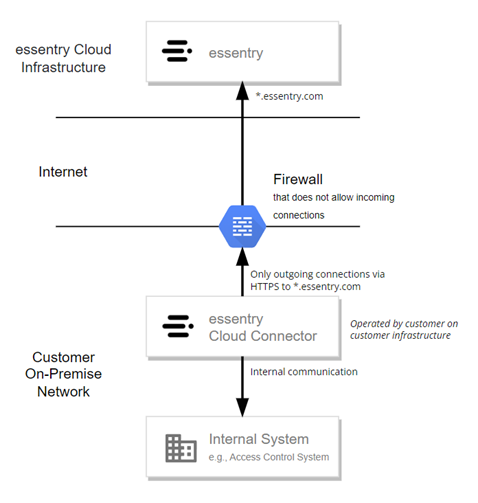
The simplified architecture overview for the essentry cloud connector is shown in the following diagram:
 ## Overview
Setting up the essentry cloud connector consists of three steps:
1. [Create the integration](#1-create-the-integration) in the essentry dashboard and download your `appsettings.json`.
2. [Install the cloud connector](#2-install-the-cloud-connector) on your Windows system using the installer.
3. [Configure the connected system](#3-configure-the-connected-system) in the configuration UI.
## 1. Create the Integration
First, create a cloud connector integration in the essentry dashboard. This generates the credentials and the `appsettings.json` file that the installer needs.
Sign in to the essentry dashboard and open the [Integrations](https://app.essentry.com/settings/company/integrations) page (**Company Settings → Integrations**).
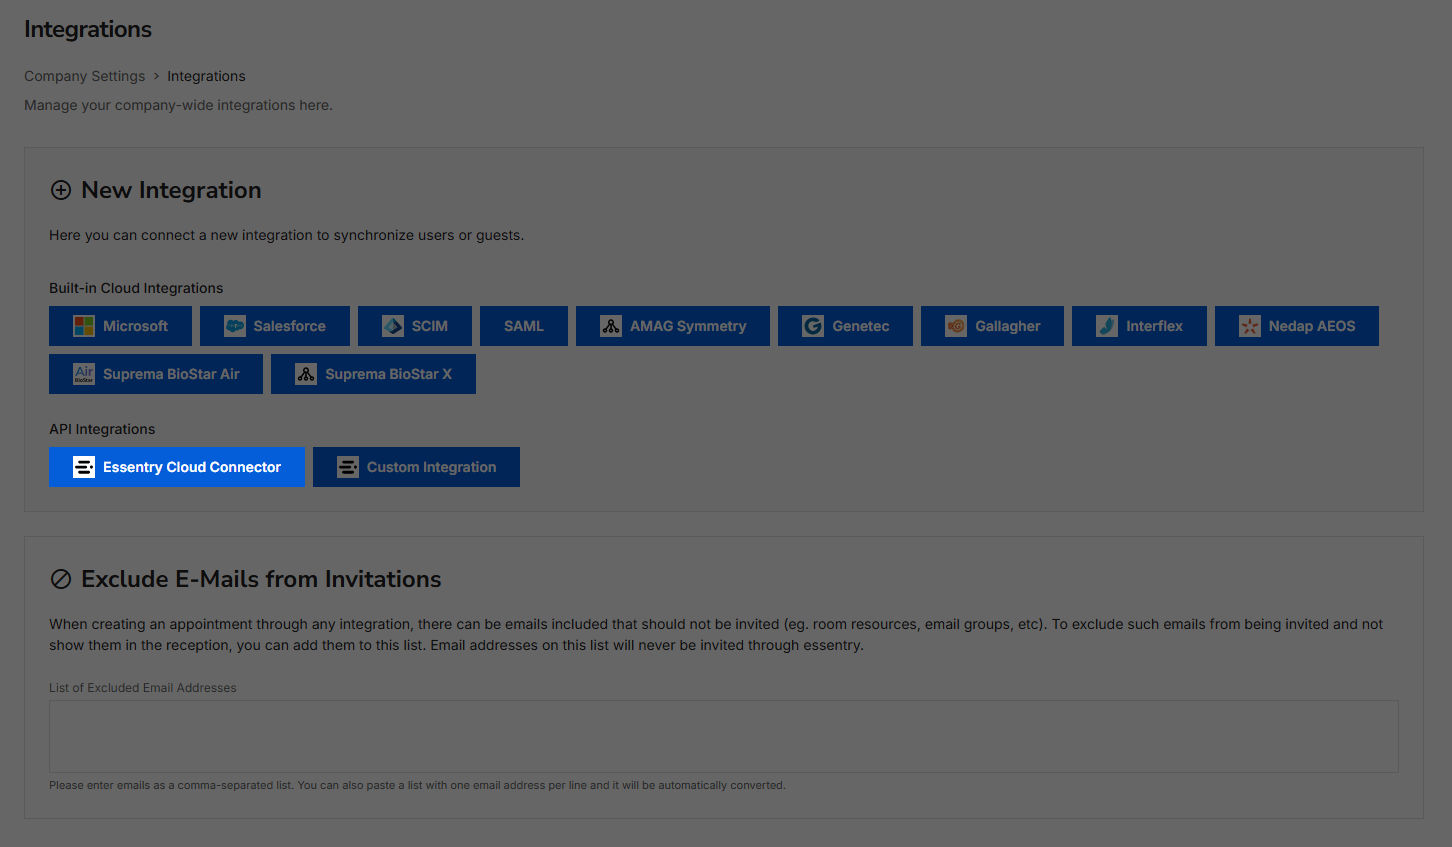
Under **API Integrations**, select **Essentry Cloud Connector**.
## Overview
Setting up the essentry cloud connector consists of three steps:
1. [Create the integration](#1-create-the-integration) in the essentry dashboard and download your `appsettings.json`.
2. [Install the cloud connector](#2-install-the-cloud-connector) on your Windows system using the installer.
3. [Configure the connected system](#3-configure-the-connected-system) in the configuration UI.
## 1. Create the Integration
First, create a cloud connector integration in the essentry dashboard. This generates the credentials and the `appsettings.json` file that the installer needs.
Sign in to the essentry dashboard and open the [Integrations](https://app.essentry.com/settings/company/integrations) page (**Company Settings → Integrations**).
Under **API Integrations**, select **Essentry Cloud Connector**.
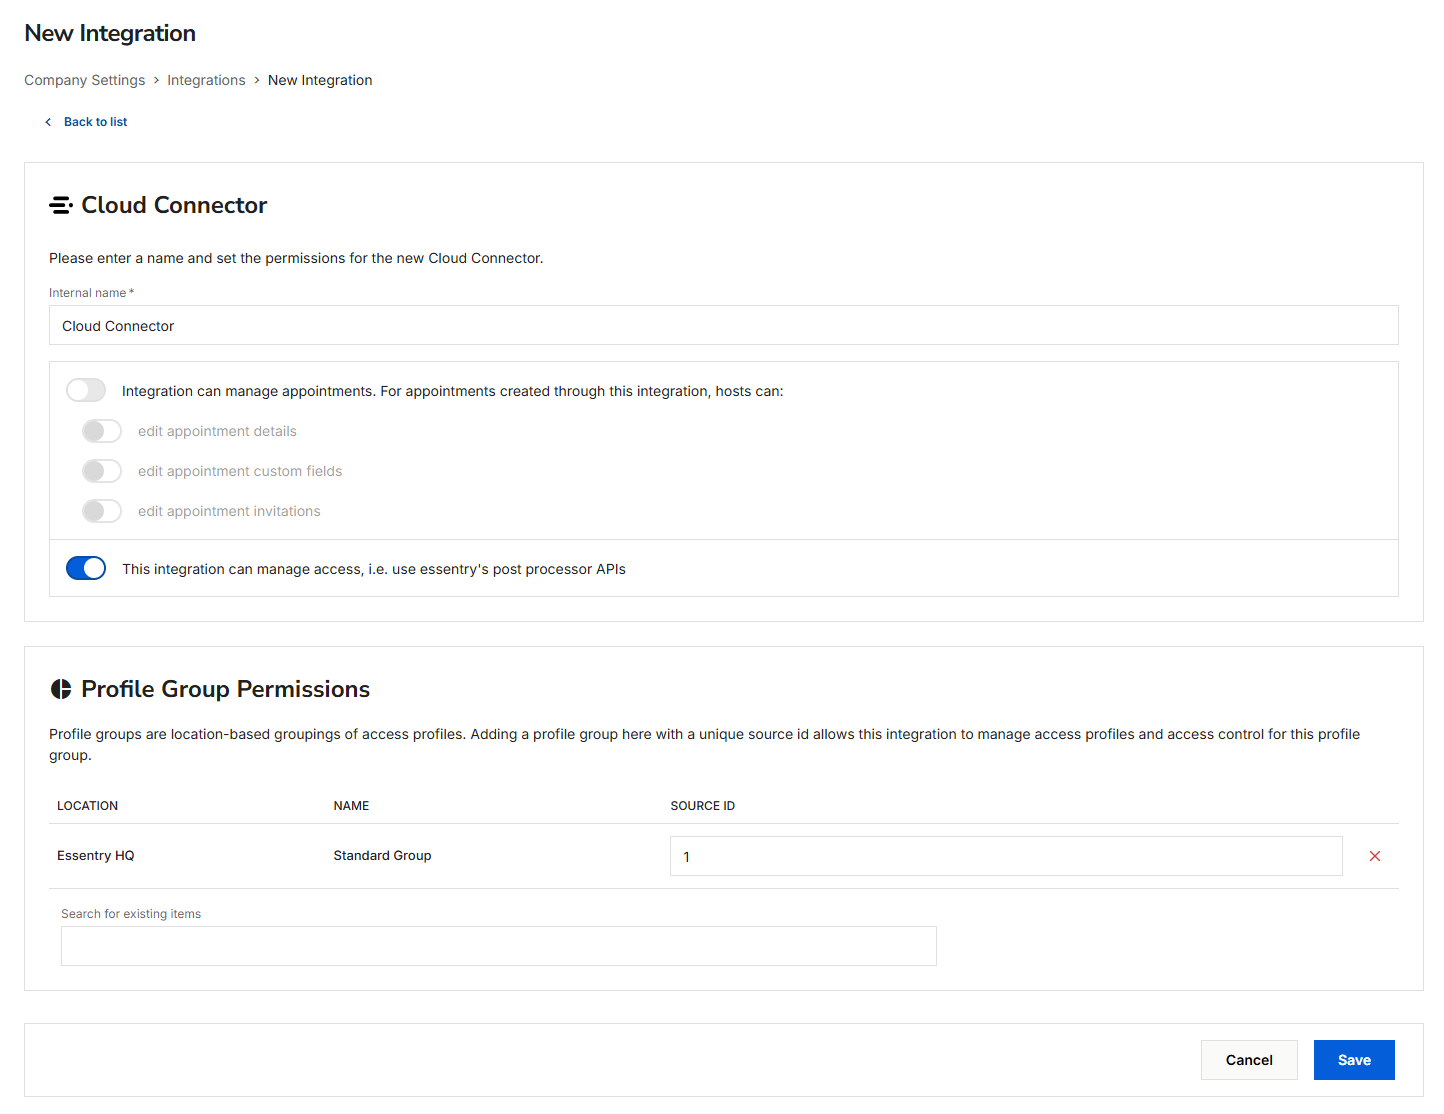
 Configure the new integration:
1. Enter an **Internal name** for the integration.
2. Enable **This integration can manage access, i.e. use essentry's post processor APIs**.
3. Under **Profile Group Permissions**, add a profile group and assign it a **Source ID**. This source id links the profile group to the connected system and is referenced later in the configuration UI.
Click **Save**.
Configure the new integration:
1. Enter an **Internal name** for the integration.
2. Enable **This integration can manage access, i.e. use essentry's post processor APIs**.
3. Under **Profile Group Permissions**, add a profile group and assign it a **Source ID**. This source id links the profile group to the connected system and is referenced later in the configuration UI.
Click **Save**.
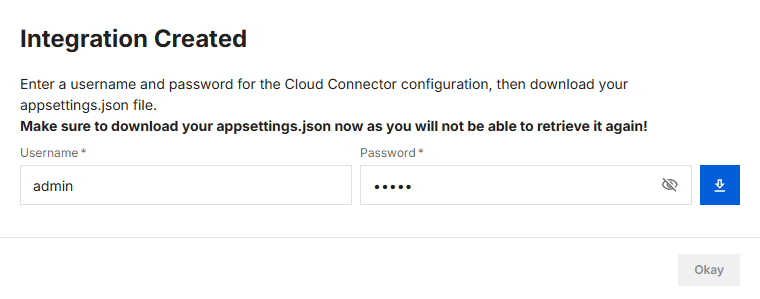
 After saving, enter a **Username** and **Password** for the cloud connector configuration UI. You will use these credentials to log in later, so keep them safe.
Then download your `appsettings.json` file.
Download your `appsettings.json` now — you will not be able to retrieve it
again. If you lose it, you have to create a new integration.
After saving, enter a **Username** and **Password** for the cloud connector configuration UI. You will use these credentials to log in later, so keep them safe.
Then download your `appsettings.json` file.
Download your `appsettings.json` now — you will not be able to retrieve it
again. If you lose it, you have to create a new integration.
 ## 2. Install the Cloud Connector
You receive the essentry cloud connector from us as a ZIP file containing the installer (`.exe`). The installer registers the cloud connector as a Windows service and installs all required dependencies automatically.
Extract the ZIP file and run the installer (`.exe`). When prompted, provide the `appsettings.json` file you downloaded in [step 1](#1-create-the-integration).
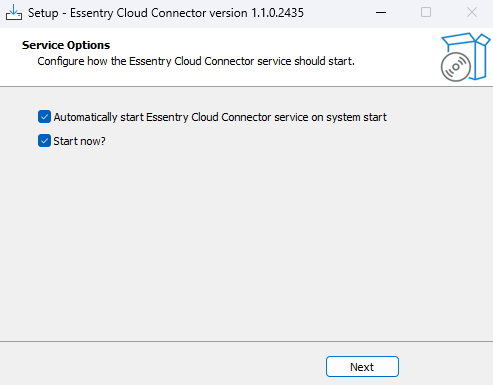
On the **Service Options** screen, enable both options:
1. **Automatically start Essentry Cloud Connector service on system start**
2. **Start now?**
## 2. Install the Cloud Connector
You receive the essentry cloud connector from us as a ZIP file containing the installer (`.exe`). The installer registers the cloud connector as a Windows service and installs all required dependencies automatically.
Extract the ZIP file and run the installer (`.exe`). When prompted, provide the `appsettings.json` file you downloaded in [step 1](#1-create-the-integration).
On the **Service Options** screen, enable both options:
1. **Automatically start Essentry Cloud Connector service on system start**
2. **Start now?**
 Continue and finish the installation. The cloud connector is now registered as a Windows service that starts automatically and recovers from failures. The service name starts with `essentry_agent_`.
## 3. Configure the Connected System
Once the service is running, open the configuration UI to connect your on-premise system.
Open [http://localhost:10900](http://localhost:10900) in a browser on the system where the cloud connector is installed, and log in with the **Username** and **Password** you set in [step 1](#1-create-the-integration).
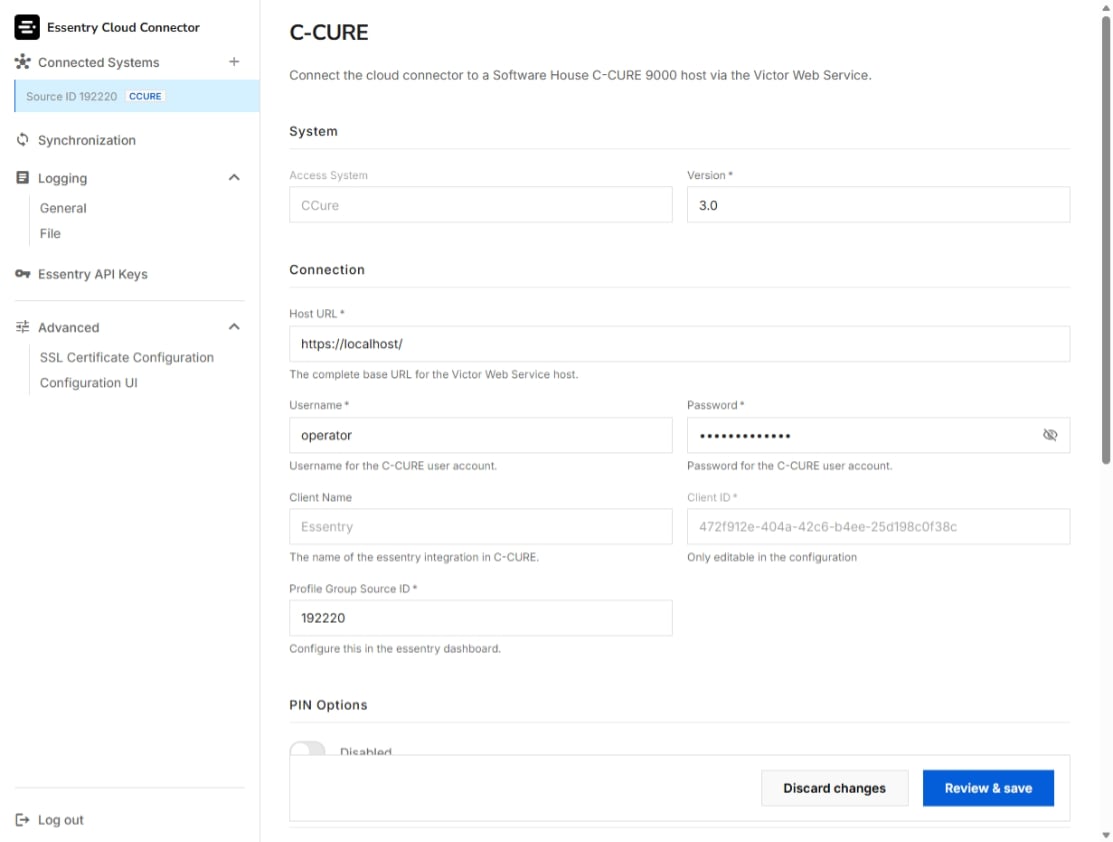
Add and configure your connected system (for example C-CURE). Enter the connection details for your access control system and set the **Profile Group Source ID** to the source id you assigned in the essentry dashboard.
Continue and finish the installation. The cloud connector is now registered as a Windows service that starts automatically and recovers from failures. The service name starts with `essentry_agent_`.
## 3. Configure the Connected System
Once the service is running, open the configuration UI to connect your on-premise system.
Open [http://localhost:10900](http://localhost:10900) in a browser on the system where the cloud connector is installed, and log in with the **Username** and **Password** you set in [step 1](#1-create-the-integration).
Add and configure your connected system (for example C-CURE). Enter the connection details for your access control system and set the **Profile Group Source ID** to the source id you assigned in the essentry dashboard.
 For system-specific settings, see the [Configuration](/cloud-connector/configurations/c-cure) guides.
## Upgrading
To upgrade the essentry cloud connector, run the installer from the new version's ZIP file. It updates the existing installation in place. Your existing configuration and `appsettings.json` are preserved.
## Uninstallation
Uninstall the essentry cloud connector like any other Windows application via **Settings → Apps → Installed apps** (or **Control Panel → Programs and Features**). Select **Essentry Cloud Connector** and choose **Uninstall**.
Optionally, delete any remaining files from the installation directory and the configured log directory afterwards.
For system-specific settings, see the [Configuration](/cloud-connector/configurations/c-cure) guides.
## Upgrading
To upgrade the essentry cloud connector, run the installer from the new version's ZIP file. It updates the existing installation in place. Your existing configuration and `appsettings.json` are preserved.
## Uninstallation
Uninstall the essentry cloud connector like any other Windows application via **Settings → Apps → Installed apps** (or **Control Panel → Programs and Features**). Select **Essentry Cloud Connector** and choose **Uninstall**.
Optionally, delete any remaining files from the installation directory and the configured log directory afterwards.